Opening the eSun eBox Lite
As mentioned in my last post, I recently purchased an eSun eBox Lite filament drier. All was good at first, and it performed well drying out a roll of PETG, but the next time I came to use it I noticed that the fan wasn’t running. It was still within the return window, but as it’s both pretty bulky and pretty cheap, I decided to have a go at fixing the problem instead. This proved straightforward, and so I’d still recommend this as a low-cost and effective drier.
I came across this Reddit post describing a similar problem. It pointed me in the right direction, but the thread is a few years old and doesn’t include any pictures, so I thought it worth writing a quick post to illustrate the process of taking the box apart.
Doing so is pretty straightforward:
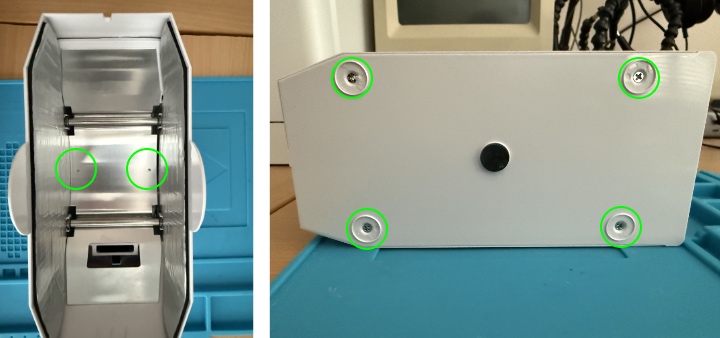
- Open the drier and remove the two small screws in the heating plate with a Phillips 0 screwdriver (left hand photo).
- Close the drier and put it on its side, with the bottom facing you.
- Remove the four rubber feet at the corners (right hand photo; you don’t need to remove the middle one), and remove the screws underneath these with a Phillips 1 screwdriver.
- Gently slide the bottom of the drier out. Be careful of the wires connecting to the circuit board to the heating element, the control panel and the fan. The panel and the fan can be removed from the upper housing; these just slot into the plastic.
Once the device is open, it’s easy to check the connectors for the various components on the circuit board, which it seems have a tendency to work lose if it’s moved around too much. Sure enough, I reseated the fan connecter and everything was back to working as normal. It’s safe to (briefly) power it up to test it while disassembled, and when you’re happy reassembly is just matter of reversing the above steps.